项目上第一次引入redis来解决并发问题,所以记录下使用中体会的一些要领以备忘(以下行文以jedis作为客户端为案例):
(1)jedis最好设置下clientname,以便于trouble shooting, 但是spring-data-redis并没有提供设置方法(已提交pull request去支持:https://github.com/spring-projects/spring-data-redis/pull/219, 已merged),这点还是直接调用jedis方便。
public JedisSentinelPool(String masterName, Set sentinels,
final GenericObjectPoolConfig poolConfig, final int connectionTimeout, final int soTimeout,
final String password, final int database, final String clientName) {
this.clientName = clientName;
….
}
note: jedis的经常用的pool都支持clientname, 但是ShardedJedisPool还不支持clientname设置,也已提交pull request: https://github.com/xetorthio/jedis/pull/1383,不知道何时可以merge(至今未merge,倒是merge了cluster模式的支持)。
这样可以通过client list来获取client的name,对以后的troubleshooting必然有所帮助,例如:获悉某时刻连接数最多的app是哪个,每个app都在执行什么命令等。
10.224.38.23:0>client list

"id=8 addr=10.224.38.30:26636 fd=11 name=sentinel-ba1e0dae-pubsub age=1350878 idle=0 flags=N db=0 sub=1 psub=0 multi=-1 qbuf=0 qbuf-free=0 obl=0 oll=0 omem=0 events=r cmd=subscribe //set client name

id=18 addr=10.140.201.34:51637 fd=12 name= age=85650 idle=85619 flags=N db=0 sub=0 psub=0 multi=-1 qbuf=0 qbuf-free=0 obl=0 oll=0 omem=0 events=r cmd=scan // not set
(2)清理keys及key的设置规则
清理keys一般不会删除所有的,否则公用的也被删除了,所以如果一般删除的话,要求keys有规则,这要求keys的设置符合一定的规则。
以下删除了所有的keys:
@Override
public void evictAll() {
Set keySet = redisTemplate.keys("*"); //匹配了所有的key
if (keySet == null ||keySet.size()==0) {
logger.debug("no keys are found");
return;
}

this.redisTemplate.delete(keySet);
}
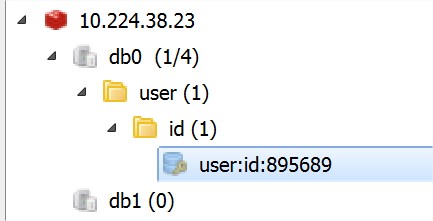
key设置要具备一定的规则(以:风格),这样便于管理:
set user:id:895689 “fujian”
(3)有文章评论常用的setnx执行完后,如果定义过期时间,可能会失败,导致数据永远删除不了,所以推荐pipeline之类一步将命令发出。但是目前已经有新的set方法来合并这2步操作:
原先方法:
return redisClient.execute(jedis -> {
Long setnx = jedis.setnx(meetingKey, ip);
jedis.expire(meetingKey, 30); //这边可能会出错
if (setnx == 0)
return jedis.get(meetingKey);
return ip;
});
新的方法:
return redisClient.execute(jedis -> {
String value = jedis.set(meetingKey, ip, "NX", "EX", 30);//原子操作
if (value == null)//返回的是OK或者null,区别于setnx的1和0.
return jedis.get(meetingKey);
return ip;
});
(4)db的选择,默认有16个db, 默认采用的是db0, 如果需要更改,可以修改databaseid, 有文章评论说,每次操作都需要切换,实际上只做一次就可以了。
@Override
public void activateObject(PooledObject pooledJedis) throws Exception {
final BinaryJedis jedis = pooledJedis.getObject();
if (jedis.getDB() != database) {
jedis.select(database); //仅仅select 1次足够
}

}

 @Override
  public String select(final int index) {
    checkIsInMultiOrPipeline();
    client.select(index);
    String statusCodeReply = client.getStatusCodeReply();
    client.setDb(index);

    return statusCodeReply;
  }
但是分库一定要协商好,否则贸然使用非默认的,例如2,结果配置的database数目不是3个,则和预想的不同,且需要注意,默认是16,但是可以只配置1个,不分库.
参考配置文件:
# Set the number of databases. The default database is DB 0, you can select
# a different one on a per-connection basis using SELECT where
# dbid is a number between 0 and 'databases'-1
databases 16
CMD切换方法:
select 0 #打开id为0的数据库,也就是第一个库。

源码分析:
db.c
void selectCommand(client *c) {
    long id;

    if (getLongFromObjectOrReply(c, c->argv[1], &id,
        "invalid DB index") != C_OK)
        return;

    if (server.cluster_enabled && id != 0) {
        addReplyError(c,"SELECT is not allowed in cluster mode");
        return;
    }
    if (selectDb(c,id) == C_ERR) {
        addReplyError(c,"DB index is out of range");
    } else {
        addReply(c,shared.ok);
    }
}


int selectDb(client *c, int id) {
    if (id < 0 || id >= server.dbnum)
        return C_ERR;
    c->db = &server.db[id];
    return C_OK;
}

robj *lookupKeyWriteOrReply(client *c, robj *key, robj *reply) {
    robj *o = lookupKeyWrite(c->db, key);
    if (!o) addReply(c,reply);
    return o;
}

server.c  初始化


//取默认配置多少个db
void initServerConfig(void) {
    server.dbnum = CONFIG_DEFAULT_DBNUM;
}

//申请空间
server.db = zmalloc(sizeof(redisDb)*server.dbnum);

//初始化
for (j = 0; j < server.dbnum; j++) {
        server.db[j].dict = dictCreate(&dbDictType,NULL);
        server.db[j].expires = dictCreate(&keyptrDictType,NULL);
        server.db[j].blocking_keys = dictCreate(&keylistDictType,NULL);
        server.db[j].ready_keys = dictCreate(&objectKeyPointerValueDictType,NULL);
        server.db[j].watched_keys = dictCreate(&keylistDictType,NULL);
        server.db[j].id = j;
        server.db[j].avg_ttl = 0;
}
(5)redis可以配置最大memory以保护自己,超过最大memory使用的清理策略可以参考配置文件(http://download.redis.io/redis-stable/redis.conf):
# maxmemory

# MAXMEMORY POLICY: how Redis will select what to remove when maxmemory
# is reached. You can select among five behaviors:
#
# volatile-lru; remove the key with an expire set using an LRU algorithm
# allkeys-lru; remove any key according to the LRU algorithm
# volatile-random; remove a random key with an expire set
# allkeys-random; remove a random key, any key
# volatile-ttl; remove the key with the nearest expire time (minor TTL)
# noeviction; don't expire at all, just return an error on write operations
#
# Note: with any of the above policies, Redis will return an error on write
# operations, when there are no suitable keys for eviction.
#
# At the date of writing these commands are: set setnx setex append
# incr decr rpush lpush rpushx lpushx linsert lset rpoplpush sadd
# sinter sinterstore sunion sunionstore sdiff sdiffstore zadd zincrby
# zunionstore zinterstore hset hsetnx hmset hincrby incrby decrby
# getset mset msetnx exec sort
#
# The default is:
#
# maxmemory-policy noeviction
(6)redis最多支持多少连接? 及客户端pool的配置应该如何?
redis server默认最多支持1万连接。
# Set the max number of connected clients at the same time. By default
# this limit is set to 10000 clients, however if the Redis server is not
# able to configure the process file limit to allow for the specified limit
# the max number of allowed clients is set to the current file limit
# minus 32 (as Redis reserves a few file descriptors for internal uses).
#
# Once the limit is reached Redis will close all the new connections sending
# an error 'max number of clients reached'.
#
# maxclients 10000
而默认的jedis pool配置如下:可知即使不启动eviction, 所有机器满负载情况下,1W/8是最多能部署的机器; 如果启用eviction的前提下,负载不大的情况下,可以部署的机器>1W/8, 所以基本可以认为,1W/maxTotal是所能部署的最多机器。如果想在负载可控的情况下提高部署机器的数量,可以启用eviction.
#pool configure
##pool basic configure
pool.maxTotal=8
pool.maxIdle=8

pool.testOnCreate=false
pool.testOnBorrow=false
pool.testOnReturn=false

pool.blockWhenExhausted=true
pool.maxWaitMillis=10000  //一定要设置,否则可能永久blocked.


## idle related configure
###timeBetweenEvictionRunsMillis -1 is not allow evict
pool.timeBetweenEvictionRunsMillis=30000
###only when timeBetweenEvictionRunsMillis>0, minIdle can work, and will close idle connection number util to minIdle
pool.minIdle=0
pool.testWhileIdle=true
###concurrent check for eviction,When negative, the number of tests performed will be ceil(getNumIdle/abs(getNumTestsPerEvictionRun)
pool.numTestsPerEvictionRun=-1
###eviction not evict idle time < minEvictableIdleTimeMillis
pool.minEvictableIdleTimeMillis=60000

##JMX
pool.jmx=true
pool.jmxNamePrefix=pool
(7) redis performance
可使用自带工具redis-benchmark
local test:
[root@wbxperf001 src]# ./redis-benchmark -p 30002 -q -n 1000000 -d 4000 -t set,get -r 100000
SET: 84402.43 requests per second
GET: 90694.72 requests per second
remote test:
[root@wbxperf001 src]# ./redis-benchmark -h 10.224.2.142 -q -n 1000000 -d 4000 -t set,get -r 100000
SET: 50782.04 requests per second
GET: 50423.56 requests per second


