redis analyst (4)- monitor redis

redis有很多monitor工具,但是基本原理都是使用info命令来获取信息然后来展示:

127.0.0.1:7001> info all
# Server
redis_version:3.2.8
redis_git_sha1:00000000
redis_git_dirty:0
redis_build_id:7599ffb66fcadaf8
redis_mode:cluster
os:Linux 2.6.32-696.6.3.el6.x86_64 x86_64
arch_bits:64
multiplexing_api:epoll
gcc_version:4.4.7
process_id:21982
run_id:b82d40a090a5b146d9f061259f2e6ecfbfa1a5e0
tcp_port:7001
uptime_in_seconds:63911
uptime_in_days:0
hz:10
lru_clock:12110104
executable:/opt/redis/bin/redis-server
config_file:/etc/redis/wbx-redis.conf

# Clients
connected_clients:2
client_longest_output_list:0
client_biggest_input_buf:0
blocked_clients:0

# Memory
used_memory:98917520
used_memory_human:94.34M
used_memory_rss:108572672
used_memory_rss_human:103.54M
used_memory_peak:98961112
used_memory_peak_human:94.38M
total_system_memory:4018577408
total_system_memory_human:3.74G
used_memory_lua:37888
used_memory_lua_human:37.00K
maxmemory:100000000
maxmemory_human:95.37M
maxmemory_policy:allkeys-lru
mem_fragmentation_ratio:1.10
mem_allocator:jemalloc-4.0.3

# Persistence
loading:0
rdb_changes_since_last_save:532485
rdb_bgsave_in_progress:0
rdb_last_save_time:1505218417
rdb_last_bgsave_status:ok
rdb_last_bgsave_time_sec:-1
rdb_current_bgsave_time_sec:-1
aof_enabled:0
aof_rewrite_in_progress:0
aof_rewrite_scheduled:0
aof_last_rewrite_time_sec:-1
aof_current_rewrite_time_sec:-1
aof_last_bgrewrite_status:ok
aof_last_write_status:ok

# Stats
total_connections_received:1074
total_commands_processed:543078
instantaneous_ops_per_sec:45
total_net_input_bytes:62456064
total_net_output_bytes:11663285
instantaneous_input_kbps:4.54
instantaneous_output_kbps:0.04
rejected_connections:0
sync_full:0
sync_partial_ok:0
sync_partial_err:0
expired_keys:0
evicted_keys:0
keyspace_hits:0
keyspace_misses:0
pubsub_channels:0
pubsub_patterns:0
latest_fork_usec:0
migrate_cached_sockets:0

# Replication
role:slave
master_host:10.224.2.144
master_port:7001
master_link_status:up
master_last_io_seconds_ago:1
master_sync_in_progress:0
slave_repl_offset:62398387
slave_priority:100
slave_read_only:1
connected_slaves:0
master_repl_offset:0
repl_backlog_active:0
repl_backlog_size:1048576
repl_backlog_first_byte_offset:0
repl_backlog_histlen:0

# CPU
used_cpu_sys:140.97
used_cpu_user:95.84
used_cpu_sys_children:0.00
used_cpu_user_children:0.00

# Commandstats
cmdstat_set:calls=439235,usec=8234980,usec_per_call=18.75
cmdstat_del:calls=93249,usec=1159357,usec_per_call=12.43
cmdstat_select:calls=1,usec=4,usec_per_call=4.00
cmdstat_auth:calls=1077,usec=7197,usec_per_call=6.68
cmdstat_ping:calls=6295,usec=16085,usec_per_call=2.56
cmdstat_flushall:calls=1,usec=14,usec_per_call=14.00
cmdstat_info:calls=2134,usec=171722,usec_per_call=80.47
cmdstat_cluster:calls=1085,usec=113780,usec_per_call=104.87
cmdstat_command:calls=1,usec=1016,usec_per_call=1016.00

# Cluster
cluster_enabled:1

# Keyspace
db0:keys=345986,expires=0,avg_ttl=0

另外对于cluster的信息,可以使用cluster info命令来展示:

127.0.0.1:7001> cluster info
cluster_state:ok
cluster_slots_assigned:16384
cluster_slots_ok:16384
cluster_slots_pfail:0
cluster_slots_fail:0
cluster_known_nodes:6
cluster_size:3
cluster_current_epoch:6
cluster_my_epoch:4
cluster_stats_messages_sent:276455
cluster_stats_messages_received:276455

这里使用collectd来收集信息,具体而言是使用collectd redis plugin来收集数据:

https://github.com/powdahound/redis-collectd-plugin

当前不支持显示更多的cluster信息,已create PR去支持.

具体配置可以配置多个:


   <LoadPlugin python>
      Globals true
    </LoadPlugin>

    <Plugin python>
      ModulePath "/opt/collectd/lib64/collectd"
      Import "redis_info"

      <Module redis_info>
        Host "localhost"
        Port {{port}}
        Auth "{{password}}"
        Verbose false
        Instance "redis"
        # Redis metrics to collect (prefix with Redis_)
       Redis_uptime_in_seconds "gauge"
Redis_uptime_in_days "gauge"
Redis_lru_clock "counter"
Redis_connected_clients "gauge"
Redis_connected_slaves "gauge"
Redis_blocked_clients "gauge"
Redis_rejected_connections "gauge"
Redis_evicted_keys "gauge"
Redis_expired_keys "gauge"
Redis_used_memory "bytes"
Redis_used_memory_peak "bytes"
Redis_maxmemory "bytes"
Redis_changes_since_last_save "gauge"
Redis_instantaneous_ops_per_sec "gauge"
Redis_rdb_bgsave_in_progress "gauge"
Redis_total_connections_received "counter"
Redis_total_commands_processed "counter"
Redis_master_repl_offset "gauge"
Redis_total_net_input_bytes "bytes"
Redis_total_net_output_bytes "bytes"
Redis_mem_fragmentation_ratio "gauge"
Redis_keyspace_hits "derive"
Redis_keyspace_misses "derive"   
Redis_cluster_slots_assigned "gauge"
Redis_cluster_slots_ok "gauge"
Redis_cluster_slots_pfail:"gauge"
Redis_cluster_slots_fail:"counter"
Redis_cluster_known_nodes:"gauge"
Redis_cluster_size "gauge"
Redis_cluster_current_epoch "gauge"
Redis_cluster_my_epoch  "gauge"
Redis_cluster_known_nodes "gauge"
Redis_cluster_stats_messages_sent "counter"
Redis_cluster_stats_messages_received "counter"
Redis_used_cpu_sys "gauge"
Redis_used_cpu_user "gauge"
Redis_used_cpu_sys_children "gauge"
Redis_used_cpu_user_children "gauge"
Redis_cmdstat_command_calls "counter"
Redis_cmdstat_command_usec "counter"
Redis_cmdstat_command_usec_per_call "gauge"
Redis_cmdstat_del_calls "counter"
Redis_cmdstat_del_usec "counter"
Redis_cmdstat_del_usec_per_call "gauge"
Redis_cmdstat_get_calls "counter"
Redis_cmdstat_get_usec "counter"
Redis_cmdstat_get_usec_per_call "gauge"
Redis_cmdstat_incr_calls "counter"
Redis_cmdstat_incr_usec "counter"
Redis_cmdstat_incr_usec_per_call "gauge"
Redis_cmdstat_info_calls "counter"
Redis_cmdstat_info_usec "counter"
Redis_cmdstat_info_usec_per_call "gauge"
Redis_cmdstat_lpop_calls "counter"
Redis_cmdstat_lpop_usec "counter"
Redis_cmdstat_lpop_usec_per_call "gauge"
Redis_cmdstat_lpush_calls "counter"
Redis_cmdstat_lpush_usec "counter"
Redis_cmdstat_lpush_usec_per_call "gauge"
Redis_cmdstat_lrange_calls "counter"
Redis_cmdstat_lrange_usec "counter"
Redis_cmdstat_lrange_usec_per_call "gauge"
Redis_cmdstat_monitor_calls "counter"
Redis_cmdstat_monitor_usec "counter"
Redis_cmdstat_monitor_usec_per_call "gauge"
Redis_cmdstat_mset_calls "counter"
Redis_cmdstat_mset_usec "counter"
Redis_cmdstat_mset_usec_per_call "gauge"
Redis_cmdstat_ping_calls "counter"
Redis_cmdstat_ping_usec "counter"
Redis_cmdstat_ping_usec_per_call "gauge"
Redis_cmdstat_sadd_calls "counter"
Redis_cmdstat_sadd_usec "counter"
Redis_cmdstat_sadd_usec_per_call "gauge"
Redis_cmdstat_select_calls "counter"
Redis_cmdstat_select_usec "counter"
Redis_cmdstat_select_usec_per_call "gauge"
Redis_cmdstat_set_calls "counter"
Redis_cmdstat_set_usec "counter"
Redis_cmdstat_set_usec_per_call "gauge"
Redis_cmdstat_setex_calls "counter"
Redis_cmdstat_setex_usec "counter"
Redis_cmdstat_setex_usec_per_call "gauge"
Redis_cmdstat_spop_calls "counter"
Redis_cmdstat_spop_usec "counter"
Redis_cmdstat_spop_usec_per_call "gauge"
Redis_cmdstat_srem_calls "counter"
Redis_cmdstat_srem_usec "counter"
Redis_cmdstat_srem_usec_per_call "gauge"
      </Module>
   
    </Plugin>

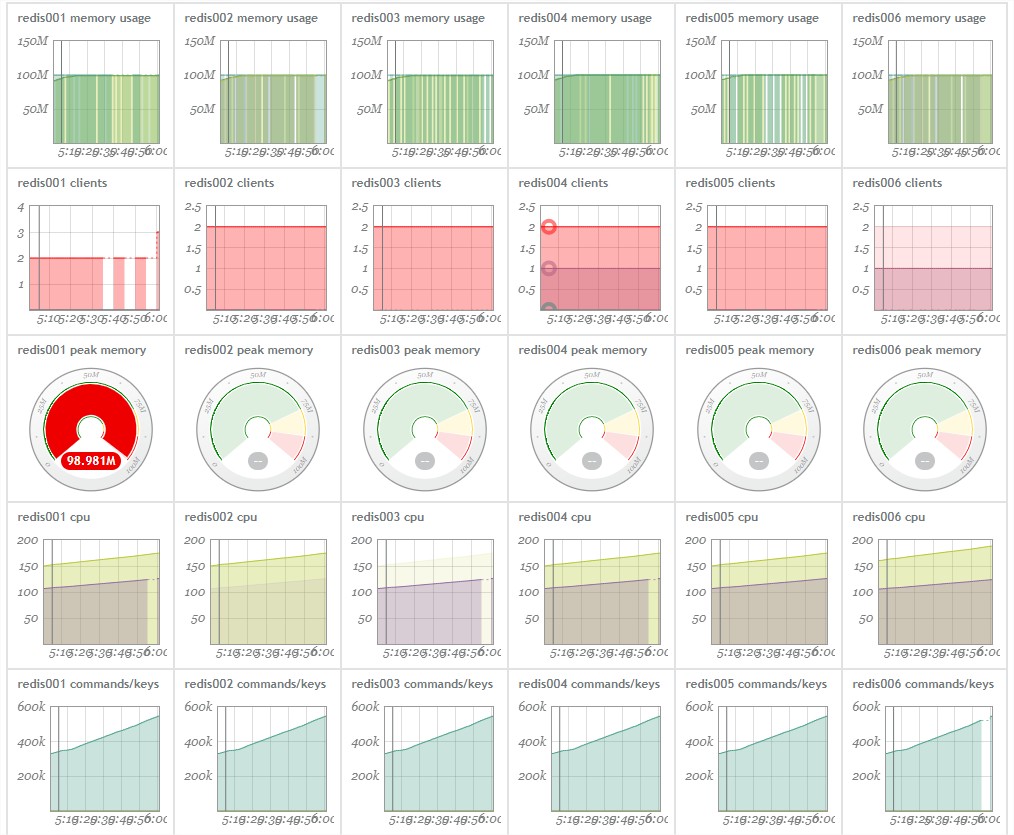
效果图(以circonus为例,当然也可以使用其他的展示平台):

之后继续可以创建alert来报警。

例如监控redis是否继续活着,可以使用uptime_in_seconds多久没有数据,就触发报警,但是这种情况,考虑假设collectd有问题或者展示平台的收集模块有问题,会导致误报,所以这里不防尝试,主动报错的方式。
比如service不服务直接报告一个状态错误,这样如果有这个状态,且错误,一定就是错误,这样就可以避免误报:

例如修改python redis plugin:

        s = socket.socket(socket.AF_INET, socket.SOCK_STREAM)
        s.connect((conf['host'], conf['port']))
        log_verbose('Connected to Redis at %s:%s' % (conf['host'], conf['port']))
    except socket.error, e:
        collectd.error('redis_info plugin: Error connecting to %s:%d - %r'
                       % (conf['host'], conf['port'], e))
        return {"alive" : "0"}  //原来是return None

最终效果:


ALERT Severity 1
Check: rediscluster / redis001
Host: 10.224.2.141
Metric: redis_info`redis`gauge`alive (0.0)
Occurred: Wed, 13 Sep 2017 16:24:30

redis server is down, please check......

但是这种情况仍然需要考虑一种情况,假设监控是每1分钟监控一次,然后1分钟内redis完成了异常关闭和守护进程重启的完整流程,下次监控周期,alive还是正常。所以最靠谱的办法是多个维度监控:例如再结合监控pid是否改变过,下面汇总下一些常见需求和指标:

1 monitor if process be restarted:

process_id:14330

or check uptime_in_seconds if be 0.

2 速率
Redis_instantaneous_ops_per_sec

3 连接客户端数
Redis_connected_clients “gauge”
redis analyst (3)- auto deploy redis cluster

在adopt redis cluster之前,第一件需要做的事情是自动化部署redis cluster, 基本流程如下:

一般安装流程:

a. prepare all nodes hardware
b. delete all old configures(such as nodes.conf) and persistence file(such as rdb/aof)
c. auto install all redis package beside ruby
d. change all nodes' configure to enable cluster
e. startup all nodes
f. use redis-trib.rb to create cluster

重建cluster流程:

a. flush all nodes' data
b. cluster reset all nodes.
c. redis-trbie.rb create cluster.

下面提及几个自动部署redis cluster的要点:

(1)关于授权问题:
官方的cluster管理工具/opt/redis/bin/redis-trib.rb不支持密码,所以现在一般文章提到的做法是准备好一批redis nodes后,先不做授权,然后等create cluster之后,逐个将所有的node加密,保存密码。

config set 
config rewrite

但是如果按照这样的自动化的问题是,假设重新部署,需要重新run redis-trib.rb的时候,仍然需要去掉密码,同时使用其他功能时,比如fix, check等也需要去掉密码,比较繁琐。所以自动化这步:
可以继续按照传统的方式来做:先设置密码,后调用redis-trib.rb来创建,这里有两种方法实现:
a)直接修改redis-trib.rb,加上使用密码的功能:
参考文章:
https://trodzen.wordpress.com/2017/02/09/redis-cluster-with-passwords/

b)修改redis-trib.rb调用的ruby lib,加上密码的功能,这样也可以一劳永逸:

/usr/lib/ruby/gems/1.8/gems/redis-3.3.3/lib/redis/client.rb

    DEFAULTS = {
      :url => lambda { ENV["REDIS_URL"] },
      :scheme => "redis",
      :host => "127.0.0.1",
      :port => 6379,
      :path => nil,
      :timeout => 5.0,
      :password => "{{password}}",
      :db => 0,
      :driver => nil,
      :id => nil,
      :tcp_keepalive => 0,
      :reconnect_attempts => 1,
      :inherit_socket => false
    }

(2) 关于cluster的重建
在已有的cluster的基础上,直接重新建立cluster会报错:

echo yes | /opt/redis/bin/redis-trib.rb create --replicas 1 10.224.2.141:8690 10.224.2.142:8690 10.224.2.143:8690 10.224.2.144:8690 10.224.2.145:8690 10.224.2.146:8690
[ERR] Node 10.224.2.141:8690 is not empty. Either the node already knows other nodes (check with CLUSTER NODES) or contains some key in database 0.

顾名思义,这里有2种情况:
a)存在已有数据: 针对这种情况需要清理数据:/opt/redis/bin/redis-cli -p 8690 -a P@ss123 flushall
b)已经是cluster了:针对此情况需要重置cluster: /opt/redis/bin/redis-cli -p 8690 -a P@ss123 cluster reset

同时,还可能遇到这种错误:

opt/redis/bin/redis-cli -h 10.224.2.146 -p 8690 -a P@ss123 cluster reset
["ERR CLUSTER RESET can't be called with master nodes containing keys\n", '\n']

因为需要保持以上2个命令的顺序步骤来做。

(3)关于重新部署的数据清理:
如果重新装包之后,直接启动,仍然会存在一些数据,因为redis cluster可能会存在rdb/aof文件在磁盘上,在启动时,会读取这些文件,所以直接重新装包在原来目录,什么配置都不变情况下,会导致读取过去的数据,所以需要清理掉数据,当然既然是重新部署,所以保存cluster信息的nodes.conf文件也需要清理:

rm -rf /etc/redis/nodes.conf
rm -rf /opt/redis/dump.rdb
rm -rf /opt/redis/appendonly.aof

(4) 关于日志的rotate
既然自动化部署,需要长久运行,需要日志rotate,以防止log越来越多。

1)在redis的配置文件中指定日志文件:

#级别不能设置太高,否则log太多,使用默认即可:
loglevel verbose
logfile "/var/redis/log/redis.log"

2)创建rotate配置:
在/etc/logrotate.d/目录下创建文件,例如redis_log_rotate

//每天归档,保存15天。
/var/redis/log/redis*.log {
    daily
    rotate 15  
    copytruncate
    delaycompress
    compress
    notifempty
    missingok
}

(5) 关于启动、关闭,查看redis服务脚本与自动重启

需要写一个集中的管理脚本来维护redis的启动、关闭等,例如


for ARG in $@ $ARGS
do
	case $ARG in
	start)
		echo "##################begin to start redis server##################"

		#setting the value of os parameter
		#sh /opt/redis/bin/set_os_parms.sh
		   
		#start redis server
		/opt/redis/bin/redis-server /etc/redis/wbx-redis.conf
		echo "##################complete to start redis server##################"
		;;
	stop)
		echo "##################begin to stop redis server##################"
		dtpid=`ps -efw --width 1024 |grep redis-server |grep -v grep |awk '{print $2}'`
		dtpid=`echo $dtpid`
		if [ "x$dtpid" = "x" ]
		then
			echo "INFO: Redis Server is not running."
			echo "##################complete to stop redis server##################"
			exit 0
		else
			/opt/redis/bin/redis-shutdown  wbx-redis
			echo "##################complete to stop redis server##################"
		fi
		;;
	status)
	
		echo "##################begin to check redis server status##################"
		dtpid=`ps -efw --width 1024|grep redis-server |grep -v grep|awk '{print $2}'`
		dtpid=`echo $dtpid`
		if [ "x$dtpid" != "x" ]
		        then
		                echo "[INFO] Redis Server($dtpid) is started."
				echo "##################complete to check redis server status ##################"
		        else
		                echo "[INFO] Redis Server cannot be started."
                                echo "##################complete to check redis server status ##################"
		                exit 1;
		fi
		;;
	*)

echo "Usage: $0 (start|stop|status)"
cat <<EOF

start		- start Redis Server
stop		- stop  Redis Server
status      - check Redis Server status

EOF
	;;

	esac

done

写完后,可以绑定守护程序来保持redis service挂了后,自动拉起服务。这种情况,对于纯当cache的redis cluster比较实用。

(6) 创建create cluster命令:

最终我们要得到一个cluster create 的命令,但是在自动化部署,所以需要动态拼接处redis cluster创建命令,例如:

/opt/redis/bin/redis-trib.rb create –replicas 1 10.224.2.141:8690 10.224.2.142:8690 10.224.2.143:8690 10.224.2.144:8690 10.224.2.145:8690 10.224.2.146:8690

因为事先不定知道机器多少,或者说,最好不要关心有多少节点,只需要保持已有的节点数可以除以replicas的配比(例如1主1从时,保持机器数是2个倍数即可)就可以了。例如可以使用下面的脚本,来动态拼接一个create cluster的命令:

#!/usr/bin/python
import os
import string

print {{system.boxList}}

def check_cluster(host_port):
 check_command = "/opt/redis/bin/redis-trib.rb check " + host_port
 result = os.popen(check_command).readlines()
 print result
 return result[-1] == "[OK] All 16384 slots covered.\n"


def destory_cluster():
 box_list = {{system.boxList}}
 for box in box_list:
 i = 0
 while i &amp;lt; 100:
 flush_command = "/opt/redis/bin/redis-cli -h " + box["ip"] + " -p {{port}} -a {{password}} flushall"
 print flush_command
 result = os.popen(flush_command).readlines()
 print result
 cluster_reset_command = "/opt/redis/bin/redis-cli -h " + box["ip"] + " -p {{port}} -a {{password}} cluster reset"
 print cluster_reset_command 
 result = os.popen(cluster_reset_command ).readlines()
 print result
 if string.find(" ".join(str(x) for x in result),"containing keys") == -1:
 break
 print "##########try again....times: " + str(i)
 i = i + 1


def stop_servers():
 print "##########stop_servers...."
 box_list = {{system.boxList}}
 for box in box_list:
 stop_command = ""  //stop command need to change here
 print stop_command
 result = os.popen(stop_command).readlines()
 print result

def start_servers():
 print "##########start_servers...."
 box_list = {{system.boxList}}
 for box in box_list:
 start_command = ""  //start command need to change here
 print start_command
 result = os.popen(start_command).readlines()
 print result
 
def clean_servers():
 print "##########clean servers's dump file...."
 box_list = {{system.boxList}}
 for box in box_list:
 clean_command = "rm -rf /opt/redis/*.rdb" 
 print clean_command
 result = os.popen(clean_command).readlines()
 print result


def create_cluster():
 box_list = {{system.boxList}}
 new_box_list = []
 for box in box_list:
 if check_cluster(box["ip"] + ":{{port}}"):
 return True
 new_box_list.append(box["ip"] + ":{{port}}")

 print "##########check complete...."
 print "##########begin to execute create cluster command...."

 create_command = "echo yes | /opt/redis/bin/redis-trib.rb create --replicas 1 " + " ".join(new_box_list)
 print create_command
 result = os.popen(create_command).readlines()[-1]
 print result
 return string.find(result,"ERR") == -1

print "##########clean all servers..."
stop_servers()
clean_servers()
start_servers()
print "##########destroy old cluster..."
destory_cluster()
print "##########create new cluster...."
if create_cluster():
 print "##########success to complete create cluster...."
else:
 print "##########fail to complete create cluster...."
 exit(1)


对于交互式的命令,可以使用echo yes |, 例如:create_command = “echo yes | /opt/redis/bin/redis-trib.rb create –replicas 1 ” + ” “.join(new_box_list)

同时考虑flushall命令在太多数据时会阻塞,让cluster切换slave,然后slave变成master后又重复,所以直接先停掉所有机器,然后删除rdb file,确保所有数据清楚。然后再启动,这样不仅可以保持数据清空,同时也保证了,所有机器都是启动状态;

另外,cluster reset的时候,为了确保用户刚好在flush数据插入了新的数据,可以尝试100次来确保rest不会出现:


ERR CLUSTER RESET can't be called with master nodes containing keys

(7)考虑需要可以配置的内容:
redis有太多配置,有一些配置项最后暴露出来可以配置,例如:

a) port和password: 安全考虑
b) loglevel: 产线环境和测试环境可以设置不同
c) metric内容: 如果有监控,一般都是通过通过info命令来实现,监控的项目要么全部配齐,要么可配
d) maxmemory: 不同机器的内存大小不同,需要设置成不同。

最终成功后:

/opt/redis/bin/redis-trib.rb create --replicas 1 10.224.2.141:8690 10.224.2.142:8690 10.224.2.143:8690 10.224.2.144:8690 10.224.2.145:8690 10.224.2.146:8690
[OK] All 16384 slots covered.

效果图: